I'm back from vacation, and I think my motivation has been renewed. Maybe. We'll see how long this lasts!
So back a few weeks before the Most Epic Cruise Ever, I had my MOH and Attendant over to help Mom and me put together Save the Dates. After three nights of prep work -- cutting the pictures, measuring the backgrounds and other layers, etc -- I was excited to see them finally come together.
With cinnamon rolls the size of dinner plates from Isles Buns and other various snacks, we popped in Bridesmaids and go to work! Oh, I almost forgot the mimosas!!
Carl made us some delicious turkey bacon avocado sliders for lunch, and we continued on with the chickflicks. 27 Dresses, Juno... Ok, so maybe Juno wasn't really wedding appropriate, but still.
In the end, we finished all the envelopes, all the Save the Dates, and welcomed in a sense of accomplishment. Maybe that was just me... Still, it took me over a week to get the dang things in the mail. -sigh- I am such a procrastinator! I wanted them in the mail before we left for the cruise, and that was that.
What do you think? I think they turned out great! All the stamping, embossing, and double-sided tape was totally worth it!
Showing posts with label DIY. Show all posts
Tuesday, March 20, 2012
Saturday, October 8, 2011
{ DIY } Folded Fabric Flowers
The working title of this post is "SQUEEEEEEEE 2, the sequel", because early this morning, Chrissy informed me that this project was FEATURED on Wedding Bee! This time is was as a part of their DIY Friday feature! I got a nod, twice in one week!! I say for a third time... HOW COOL IS THAT!!?
Anyway, now that my inner child is under control (I got another gold star and another cookie! Teacher likes me bestest!) I thought I would share the project, here!
These flowers are pretty versatile and really pretty. I sort of figured out how to make these by looking at a few pictures and a couple of shoddy tutorials... Not saying mine is perfect, either, but I think the pictures will really help. Here we go!
We're working top to bottom, left to right:
1. Start by cutting out about 15 circles. I made mine about 1.5 inches in diameter for a big, full flower.
2. Set aside one circle. This will be your base to build the flower on.
3. Take a new circle and fold it in half. Like a taco! Now I'm hungry...
4. Take one corner of the half circle and fold it into a quarter circle.
5. Flip your circle over.
6. Fold the unfolded corner back so your circle looks like the top right picture above.
7. Place your first petal onto your flower base. Don't let the base extend farther than the petal! I like to have mine just barely hang over the edge to be sure that I'm hiding the base.
8. Stitch the petal in place.
Image Source / Screen shot from Wedding Bee
Anyway, now that my inner child is under control (I got another gold star and another cookie! Teacher likes me bestest!) I thought I would share the project, here!
These flowers are pretty versatile and really pretty. I sort of figured out how to make these by looking at a few pictures and a couple of shoddy tutorials... Not saying mine is perfect, either, but I think the pictures will really help. Here we go!
We're working top to bottom, left to right:
1. Start by cutting out about 15 circles. I made mine about 1.5 inches in diameter for a big, full flower.
2. Set aside one circle. This will be your base to build the flower on.
3. Take a new circle and fold it in half. Like a taco! Now I'm hungry...
4. Take one corner of the half circle and fold it into a quarter circle.
5. Flip your circle over.
6. Fold the unfolded corner back so your circle looks like the top right picture above.
7. Place your first petal onto your flower base. Don't let the base extend farther than the petal! I like to have mine just barely hang over the edge to be sure that I'm hiding the base.
8. Stitch the petal in place.
9. Continue folding and stitching flower petals all around the base.
10. Completed base! You're a rockstar!
11. Start a second layer of petals and continue with the fold and stitch.
12. Completed flower! Now to add some bling!
13 & 14. The choice is yours! Sparkle, pearl, button... The sky is the limit.
15. Add a little fabric glue (Fabritac is awesome!) to the center of the base.
16. Attach a small fabric scrap to the glue.
17. Once the glue has set,center a wire on the fabric scrap.
18. With another dab of glue, fold the edges of the scrap fabric over the wire to secure it in place. Once it dries, twist your wire together to form a stem. If you like, wrap it in floral tape to hide the wire.
Ta da! Even my kitty Dagny insisted on making an appearance. She certainly thinks she is just as pretty as any flower.
Try them out! Make a vase of flowers for your desk at work! Give someone a flower to cheer up their day! The would be great decor for any party or a really nice accoutrement to accent any package or gift. Stitch them onto a sweater, or some shoes... Make a brooch by adding a pin back instead of the floral wire... The possibilities really are limitless. Most of all, have fun!
Monday, August 29, 2011
{ DIY } Making Sunshine
Let’s play follow the leader! Following the order of the pictures...
1. Cut out circles in the size you want to make your sunflower. Note: I made mine about 1.5 inches in diameter.
2. Fold the circle in half.
3. Fold your circle in half again and give it a good squeeze to make a soft crease in the middle... then unfold it so it is only folded once again.
4. Fold the edges of the half circle so that they evenly meet in the middle where your crease line from the previous step is.
5. Fold your fabric in half with the folds you just made on the outside when you fold.
6 & 7. Take each side and fold the fabric down once more.
8. Stick a pin in the flower petal at the base to hold it all together while you make more! I made 12 for mine, but they look cute with 8 or more petals.
Once you have the amount of petals you want, start to string them together on a piece of thread. Join your first petal to your last petal so they form a circle and... ta da! You have a flower! There will be a hole in the middle, so a button or some jewels will needed to cover this up.
I added a little fabric glue to a button to cover the hole in the middle... Now all you would have to do to make it a real flower would be to add a fabric cover to the back and attach a stem. How pretty is that?
Sunday, August 7, 2011
{ DIY } Ribbon Roses
In my second post, I mentioned my desire to make my own flowers for my wedding. I consider myself a crafty bride, and I want to put that special touch of something that's really me into our wedding. I can't believe the amount of money some people spend on flowers.
I see flowers as this beautifully tragic part of weddings... They add so much light and beauty to your day, but they wilt away. I want my flowers to be something that last and last. Maybe someday, my future daughter will use my bouquet in her rehearsal! Maybe even her wedding!
Every mother whimsies at passing down their dress. I dream of passing down something a little less traditional.
After scouring the internet for any and every tutorial on DIY wedding flowers, I found a select few patterns that I felt really were my main contenders. I'm still playing, and my awesome MOH is working on some of her own, too. So far, the results have been pretty neat.
When I first started playing, I wasn't really thinking about bouquet colors. Today, my MOH and I went to breakfast together and stopped by the local craft store and I started to put actual colors together. The ones I picked out were really a lot more bold than I thought... But with the brown dresses in late summer, I think they will be a stunning hit.
So far, I'm pretty stoked to make my first test bouquet. I'm excited to assemble a test to see the colors together and to get a handle on how many blooms to expect for each bouquet. If this goes smoothly, I would love to make all the centerpieces and table decorations myself, too! I hope I'm not taking too much on! Luckily I have a couple friends and a great MOH who have volunteered to help construct flowers. Chrissy even said today that she envisions tubs and tubs of flowers in her craft room!
So far so good! I have a couple more styles to play with yet, and I'm sure I'll post about every adventure!
I see flowers as this beautifully tragic part of weddings... They add so much light and beauty to your day, but they wilt away. I want my flowers to be something that last and last. Maybe someday, my future daughter will use my bouquet in her rehearsal! Maybe even her wedding!
Every mother whimsies at passing down their dress. I dream of passing down something a little less traditional.
After scouring the internet for any and every tutorial on DIY wedding flowers, I found a select few patterns that I felt really were my main contenders. I'm still playing, and my awesome MOH is working on some of her own, too. So far, the results have been pretty neat.
When I first started playing, I wasn't really thinking about bouquet colors. Today, my MOH and I went to breakfast together and stopped by the local craft store and I started to put actual colors together. The ones I picked out were really a lot more bold than I thought... But with the brown dresses in late summer, I think they will be a stunning hit.
So far, I'm pretty stoked to make my first test bouquet. I'm excited to assemble a test to see the colors together and to get a handle on how many blooms to expect for each bouquet. If this goes smoothly, I would love to make all the centerpieces and table decorations myself, too! I hope I'm not taking too much on! Luckily I have a couple friends and a great MOH who have volunteered to help construct flowers. Chrissy even said today that she envisions tubs and tubs of flowers in her craft room!
So far so good! I have a couple more styles to play with yet, and I'm sure I'll post about every adventure!
Wednesday, August 3, 2011
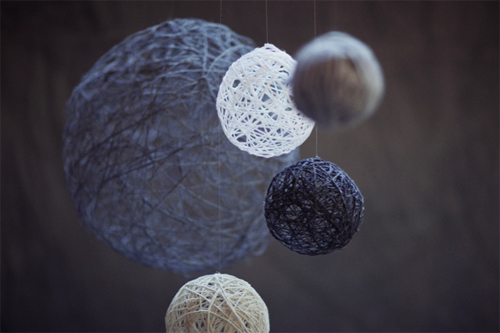
{ Inspiration } Yarn Ball Centerpieces
I am so in love with this yarn balls!!
I can't wait to get my hands dirty and try them out.
I imagine I'm going to be spending a lot of time playing with different DIY things I fall in love with... The knitter in me just went nuts over these! What a fun way to tie that little bit of personality into the wedding and reception!
I can't wait to get my hands dirty and try them out.
I imagine I'm going to be spending a lot of time playing with different DIY things I fall in love with... The knitter in me just went nuts over these! What a fun way to tie that little bit of personality into the wedding and reception!
Subscribe to:
Posts (Atom)